Mithun Shanbhag
(blog | rss | twitter | linkedin | github)

Quick links
High Availability in Azure: Availability Sets
Published on 29 Mar 2019 by Mithun ShanbhagNote: This blog post is part of a series centered around the topic of high availability in Azure:
- The basics
- SLAs and the 9s (coming soon)
- Availability Sets (this post)
- Availability Zones
- Storage redundancies
- Load balancing (coming soon)
- Application gateways (coming soon)
- Traffic management
- App Service, Function Apps
- SQL (coming soon)
- CosmosDB (coming soon)
- Wrapping up (coming soon)
I’ll not be addressing scaling (horizontal or vertical), backups/restores and resiliency/healing in these posts. Each of those topics deserve their own series, perhaps I’ll write about them in the future if time permits.
Azure Availability Sets

We’ve already discussed the concepts of fault domains, update domains and availability sets in the first post of this series. Visually, you can represent an availability set with a table as follow:
| ——- | FD0 | FD1 | FD2 |
|---|---|---|---|
| UD0 | VM1 | VM6 | |
| UD1 | VM2 | ||
| UD2 | VM3 | ||
| UD3 | VM4 | ||
| UD4 | VM5 |
No two VMs in an availability set share the same fault & update domain. This ensures that there will be at least one available VM in the event of a planned maintenance (where an entire update domain is affected) or hardware failure (where an entire fault domain is affected). The SLA for Azure VMs guarantees that if an availability set has two or more VMs, then at least one VM will be available 99.95% of the time.
Availability sets are free (you’re only charged for the VMs and resources placed in the availability sets).
Caveats, restrictions, gotchas & tidbits
-
A VM must be placed in an availability set at the time of creation. Once created, it can’t be moved into an availability set. Also it’s not possible to change an existing VM’s availability set.
- An availability set forces all its associated VMs to:
- Be in the same resource group and region (technically they all reside in the same data center actually).
- Have their network interfaces associated with the same VNET.
-
For HA, a VM can be placed in an availability set or in an availability zone. But NOT both. The former offers HA within a datacenter, the latter offers HA within a region.

-
All VMs in an availability set need not be identical, but there are hardware size constraints. Use the Get-AzVmSize powershell cmdlet to list all the VM sizes available for a particular availability set (more details).
- For an availability set with (say) 3 FDs and 5 UDs, the placement of the VMs will generally be as follows:
- 1st VM: FD0, UD0
- 2nd VM: FD1, UD1
- 3rd VM: FD2, UD2
- 4th VM: FD0, UD3
- 5th VM: FD1, UD4
- 6th VM: FD2, UD0
- and so on…
-
Generally an availability set is paired with a load balancer for traffic equi-distribution amongst the VMs in that availability set.
-
Pro tip: To ensure redundancies in all tiers of your n-tier application, each tier should be placed in a separate availability set.
- Pro tip: Use managed disks & managed availability sets for higher availability. Read more below.
Managed disks and managed availability sets
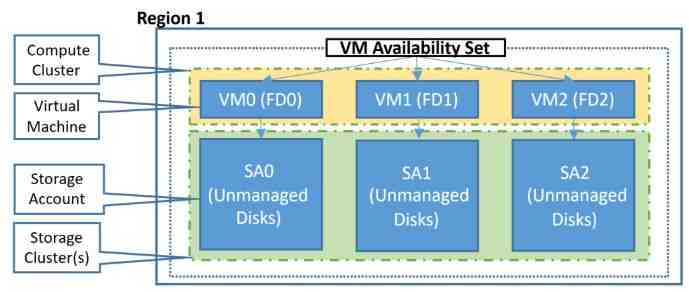
The issue with unmanaged disks in an availability set
[image attribution: Azure documentation]

The storage accounts associated with unmanaged disks in an availability set are all placed in a single storage scale unit (stamp), which then becomes a single point of failure.
Benefits of managed disks
With Azure managed disks, you no longer have to explicitly provision storage accounts to back your disks. Managed disks provide a convenient abstraction over storage accounts, blob containers and page blobs. Internally, managed disks use LRS storage (3 redundant copies within a storage scale unit inside a single datacenter).
Managed disks go in managed availability sets
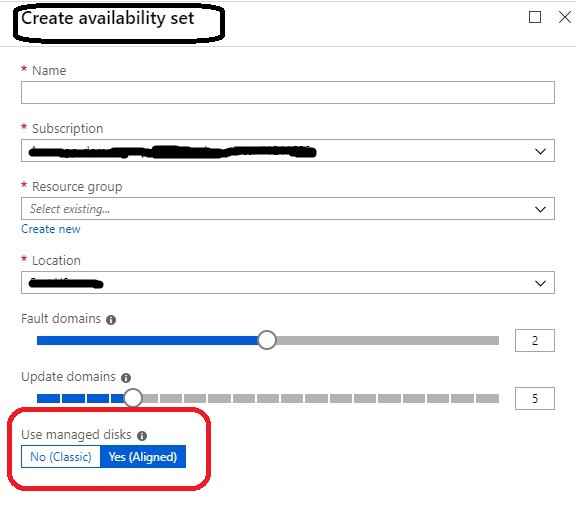
If you plan to use managed disks, please ensure you select the “aligned” option while creating the availability set. This effectively creates a managed availability set.

To migrate VMs in an existing availability set to managed disks, the availability set itself needs to be converted to a managed availability set. This can be done via the Azure portal or via the Update-AzAvailabilitySet powershell cmdlet. Once converted, only VMs with managed disks can be added to the availability set (existing VMs with unmanaged disks in the availability set will continue to operate as before).
Please note that the max number of managed FDs will depend on the availability set’s region.
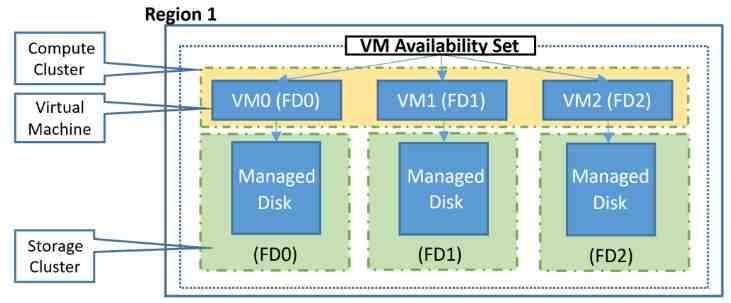
Managed availability sets get it right
[image attribution: Azure documentation]

The managed disks in an availability set are all placed in a multiple storage scale units (stamps), aligned with VM FDs, avoiding a single point of failure. In the event of a storage scale unit failing, only VMs with managed disks in that storage scale unit will fail (other VMs will be unaffected). This increases the overall availability of the VMs in that availability set.
That’s all for today folks! Comments? Suggestions? Thoughts? Would love to hear from you, please leave a comment below or send me a tweet.